电话
13363039260
▲在安装nginx前,先要安装依赖包:
yum -y install gcc gcc-c++ pcre pcre-devel zlib zlib-devel openssl-devel
▲下载nginx对应的tar包
yum -y install wget
wget http://nginx.org/download/nginx-1.13.7.tar.gz
▲解压tar 包
tar zxvf nginx-1.13.7.tar.gz
▲创建nginx 目录
mkdir -p /usr/local/nginx
▲创建用户nginx使用的www用户
# 添加www组
groupadd www
# 创建nginx运行账户www并加入到www组,不允许www用户直接登录系统
useradd -g www www -s /bin/false
修改网站目录权限
chown -R -v www:root /xxx/xxx/html
▲进入该目录下
cd nginx-1.13.7
▲编译安装
./configure --user=www --group=www --prefix=/usr/local/nginx --with-http_stub_status_module --with-http_ssl_module --with-file-aio --with-http_realip_module
make && make install
▲操作Nginx
cd /use/local/nginx/sbin
#启动nginx
./nginx
#重新载入配置
./nginx -s reload
#重新启动Nginx
./nginx -s reopen
#停止Nginx
./nginx -s stop
注:nginx本身不能处理PHP,它只是个web服务器,当接收到请求后,如果是php请求,则发给php解释器处理,并把结果返回给客户端,nginx一般是把请求发fastcgi管理进程处理,fascgi管理进程选择cgi子进程处理结果并返回被nginx。
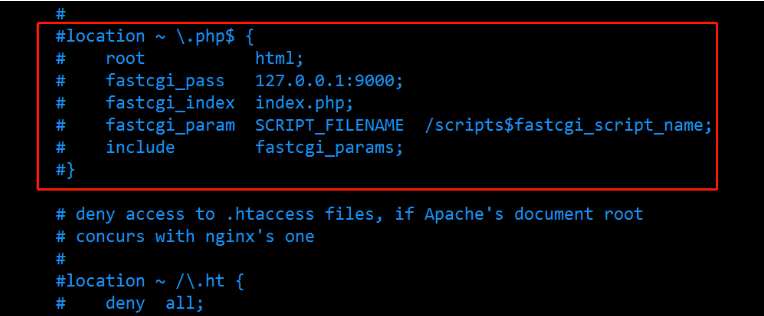
需要做如下处理,修改/usr/local/nginx/conf/nginx.conf配置文件,开启Nginx支撑PHP的模块
#配置nginx.conf文件
vim nginx.conf
修改如下代码

首先将注释,也就是#号去掉,接着将fastcgi_param对应的/scripts$fastcgi_script_name改成$document_root$fastcgi_script_name
location ~ \.php$ {
root /xxx/xxx/html;
fastcgi_pass 127.0.0.1:9000;
fastcgi_index index.php;
fastcgi_param SCRIPT_FILENAME $document_root$fastcgi_script_name;
include fastcgi_params;
}
注意:
$document_root 的参数是由root html那一行定义的,默认是在/usr/local/nginx/html/ 所以把 html换成站点根目录就正常了
保存完修改后的配置,重启一下nginx,让配置生效
[root@xxxx sbin]# ./nginx -s reload
nginx: [error] invalid PID number "" in "/usr/local/nginx/logs/nginx.pid"
如果出现上面的错误,需要在命令后面加上配置文件:
./nginx -c /usr/local/nginx/conf/nginx.conf
我们就可以通过nginx来处理PHP请求了。上面用的是ip的方式来通信,在linux中,nginx服务器和php-fpm可以通过tcp socket和unix socket两种方式实现。下面修改为socket来通信:
在/tmp/目录下创建文件:
touch www.sock
修改文件权限
chmod 777 www.sock
chown www:www /tmp/www.sock
修改nginx中的配置文件为:
location ~ \.php$ {
#fastcgi_pass 127.0.0.1:9000;
fastcgi_pass unix:/tmp/www.sock;
fastcgi_index index.php;
fastcgi_param SCRIPT_FILENAME $document_root$fastcgi_script_name;
include fastcgi_params;
}
将第一行修改成指定的运行用户:
user www www;
修改php-fpm配置文件:
vim /etc/php-fpm.d/www.conf
将其中的以下几个地方修改:
user = www
group = www
listen = /tmp/www.sock
listen.owner = www
listen.group = www
listen.mode = 0660
pm = dynamic
pm.max_children = 75
pm.start_servers = 10
pm.min_spare_servers = 5
pm.max_spare_servers = 20
pm.max_requests = 500
env[HOSTNAME] = $HOSTNAME
env[PATH] = /usr/local/bin:/usr/bin:/bin
env[TMP] = /tmp
env[TMPDIR] = /tmp
env[TEMP] = /tmp
然后重启nginx和php-fpm:
./nginx -s reload
systemctl restart php-fpm.service
就可以了。
完整配置文件如下:
user www www;
worker_processes 1;
#error_log logs/error.log;
#error_log logs/error.log notice;
#error_log logs/error.log info;
#pid logs/nginx.pid;
events {
worker_connections 1024;
}
http {
include mime.types;
default_type application/octet-stream;
#log_format main '$remote_addr - $remote_user [$time_local] "$request" '
# '$status $body_bytes_sent "$http_referer" '
# '"$http_user_agent" "$http_x_forwarded_for"';
#access_log logs/access.log main;
sendfile on;
#tcp_nopush on;
#keepalive_timeout 0;
keepalive_timeout 65;
#gzip on;
server {
listen 80;
server_name localhost;
root /xxx/xxx/html/wordpress;
#配置伪静态
location / {
if (-f $request_filename/index.html){
rewrite (.*) $1/index.html break;
}
if (-f $request_filename/index.php){
rewrite (.*) $1/index.php;
}
if (!-f $request_filename){
rewrite (.*) /index.php;
}
}
error_page 500 502 503 504 /50x.html;
location = /50x.html {
root html;
}
#静态资源处理
location ~* .(jpg|gif|png|js|css|svg)$ {
root /xxx/xxx/html/wordpress;
if (-f $request_filename) {
expires max;
break;
}
}
#PHP文件处理
location ~ \.php$ {
fastcgi_pass 127.0.0.1:9000;
#fastcgi_pass unix:/tmp/www.sock;
fastcgi_index index.php;
fastcgi_param SCRIPT_FILENAME $document_root$fastcgi_script_name;
include fastcgi_params;
}
}
}
